If you have a bird feeder set up in your backyard, you might want to start taking photos of some of the birds that visit. But do you know how to set up a bird feeder camera?
Assuming you already have a camera and a bird table with frequent visitors, here are a few tips to get the best possible images. Some buyers’ advice and more detailed instructions to set up a feeder camera follows.
Tips for Successful Feeder Camera Photography

- Keep the camera easily accessible. – Risk breaking your neck every time you collect footage, and you won’t keep it up for long.
- Face your camera slightly downwards. – High contrast, i.e., sun or bright clouds in the background, will wash color from your images.
- Move the camera closer rather than using zoom. – Optical zoom is fine, but digital zoom reduces image quality.
- Don’t have the camera too close to the action. – Many cameras have a minimum focus distance. If you move closer, the images become blurry.
- Shoot video at 60fps (frames per second) or higher. – The higher the frame rate, the less motion blur you will encounter in individual frames for still images.
Many modern cameras can shoot 4K video. However, the frame rate is usually only 24-30 fps. This is great when the subject stays still, but birds rarely do. 1080p resolution at 60fps provides brilliant clarity on video playback without breaking the bank. You should keep all of these things in mind when considering how to set up a bird feeder camera.
How to Photograph Birds at a Feeder
It is great having a bird feeder, but often the ‘Kodak’ moment has passed by the time the camera is ready. Setting up a feeder camera can capture these missed opportunities and others that you are unable to witness.
Author Note: There are a number of ways to capture images and videos of birds visiting your feeding station. Here are a few things to consider before going out and purchasing a camera.
- How much time are you willing to invest going out to the camera to collect footage?
- How often are you willing to change/recharge the batteries?
- What quality do you wish to capture?
- Do you want stills or videos?
- Night vision or daytime only?
These questions help to give an idea of how much the perfect solution for your needs will cost. Answering these questions will also provide an idea of where your priorities lie. Which features are you willing to spend extra on, and what can you sacrifice to save money?
What Camera Should I Buy for my Feeding Station?
There is a range of different cameras that can be used to capture feeding station action. From WiFi-enabled security cameras that come equipped with an inbuilt solar charger to a $10 dashboard camera. However passionate you are, there is a solution that suits you.
Dashboard Camera
Dashboard cameras are cheap, often water-resistant, and usually, come with attachments for motorcyclists. These attachments are handy when it comes to mounting your camera. Purchasing a water-resistant camera means you can bypass finding a solution to keeping the elements out.
The negatives of a dashcam are that the color quality often isn’t on par with other cameras. Battery life is usually short, sometimes less than an hour. Many dashboard cameras save a video in 5-minute clips because they don’t save automatically when the battery dies.
When you are editing your video, it is easier to look through 1 long file to find the action.
CCTV Camera
Security cameras can be used at a feeding station. They usually require mains power, which means you never have to charge batteries. Benefits include longevity, plenty of storage space for video files, and designed to be left permanently outdoors. Image storage is usually on a DVR inside the house, and this can even be linked directly to your PC.
Some CCTV cameras even have optical zoom. So you can use it for security in your home, but zoom in to watch the bird table during the day.
Negatives are mainly due to the cost and inconvenience of installation. They usually require mains power, which could mean lots of expensive cabling. The image quality of a security camera may not be as sharp as other cameras.
Trail Camera
A trail camera is activated by movement and will record photos or videos when triggered. Trail cameras are great as a ‘set up and leave it’ option. Benefits often include extended battery life, minimal effort to install, night vision, and cool camouflage looks.
Author Note: Drawbacks of a trail camera – They are generally designed for larger, slower-moving game animals. You may find that you have a lot of shots of birds’ tails as they fly away. Battery life and memory are difficult to judge, as you are unsure how much activity there has been.
Action Camera
Go-Pro is a brand of action camera that boasts fantastic image quality in a pocket-sized solution. There is a range of accessories to clip, stick or strap the camera to almost anything. Their video editing software is easy to use and very intuitive. In fact, the Go-Pro software is more powerful than most free aftermarket video editing suites.
The newest Go-Pro cameras can be quite expensive. As an action camera, they are designed to be involved in the action, so stabilizing the image is a priority for the company. There have been advances in image sensors, but most of the recent development has been in image stabilization.
This means that an older go-pro still provides a similar image quality to a newer model, as long as it is kept still.
There are other cheap action cameras available in competition with Go-Pro. These can vary greatly in price and quality. Remember, you get what you pay for. If budget is a concern, consider purchasing an older model Go-Pro, such as the Hero 6 black edition.
Go-Pro Hero 6 Black Edition
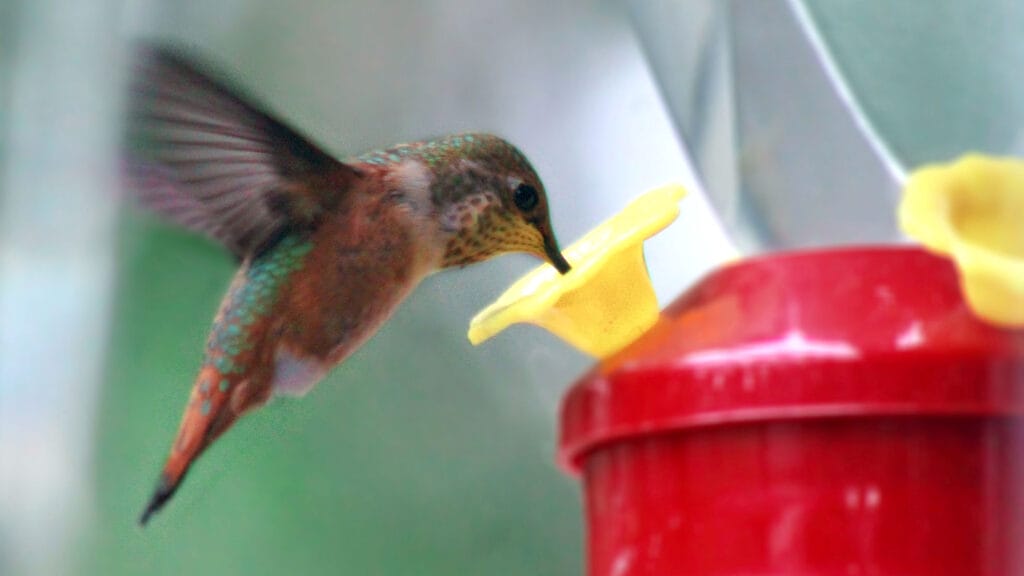
The Go-Pro Hero 6 Black edition offers video 4k resolution video capture at 60FPS. At 1080P resolution frame rate can be as high as 240fps, which is great even for hummingbirds. The picture quality from this older model camera will probably be better than anything else in a similar price range.
Most of the attachments, including the tripod, work for the camera while it is inside its protective case. Battery life may be a concern with only about 1 hour shooting time at 4k at 60fps or 1080p at 240fps. You can use a power bank to extend your battery life significantly, 10x or more. However, using a power bank does require the camera to be removed from the case.
This is a brilliant and now cheap-ish, versatile little action camera that you can use for almost any activity. With a full range of accessories and gadgets to suit your lifestyle. A Go-Pro can be used as a feeding station camera. Then you can take it with you almost anywhere.
Sadly the in-built microphones in almost all cameras are not particularly noteworthy. If you do want to record birdsong, there are external mics that can be used in conjunction with your Go-Pro. Frustratingly, these also prevent the camera from fitting into the weatherproof case.
Specialist Bird Feeder Cameras
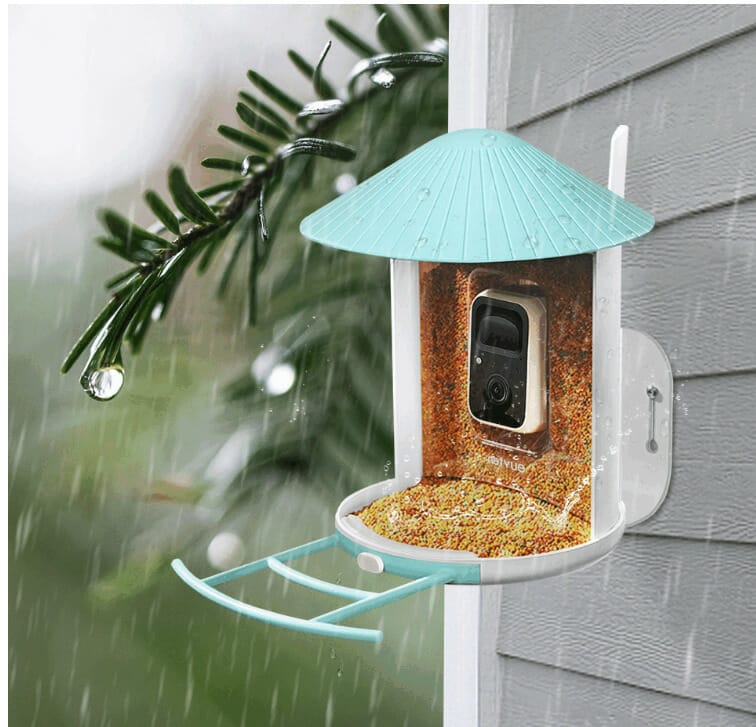
Pictured above is a Netvue model of feeder camera. As you can see, it is mounted to an exterior wall and the feed sits around the camera. The perching points are a little way out but right in front of the camera so you should get a clear shot of the bird. It has a long battery life and recharged by a USB-C cable. A memory card is not included.
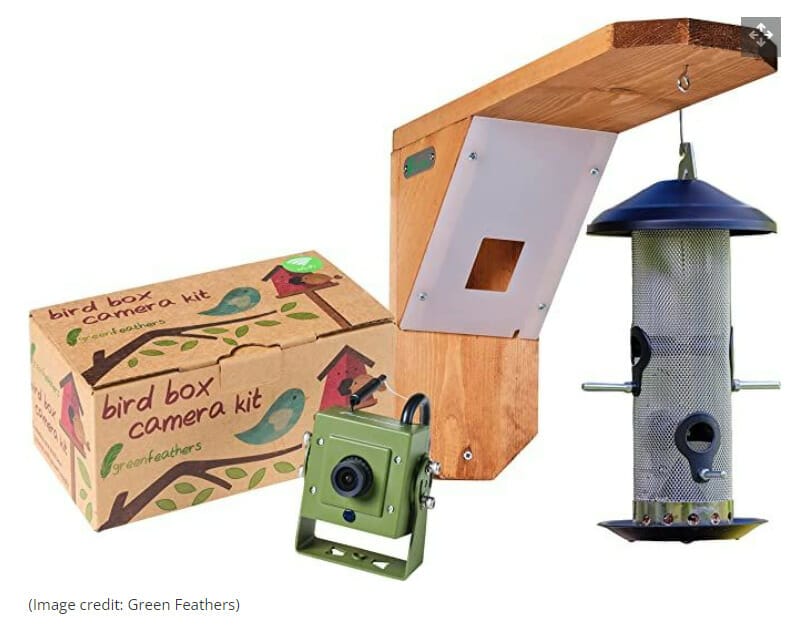
We love the look of this one, the Green Feathers model. It is cheaper and there is flexibility about how you set it up. Plus it also works with a more traditional dispenser feeder model. It comes with a charger but needs to be wired in. The best thing about this camera is that it is weatherproof and shoots at night.
Setting Up the Camera
So your bird table is used daily by a whole host of birds. Now to capture some of the action.
If your bird table is out in the open, your feeder camera will probably be only temporary. It is not easy to make a feeder camera look pretty when there is nothing to hide it. You will need a tripod/stand so the camera can see the top of the table to catch the money shots.
Face the camera towards the north if possible. Shots with the sun in the background will wash out the beautiful plumage colors. Try to get the elevation of the camera above that of the table. Looking slightly downwards will also reduce the contrast from a bright overcast sky.
Author Note: If the feeding station is under trees, you might have a few locations where you can mount the camera. If there are some darker shadows under bushes, keep these in the background. Inverse to a bright contrast, dark contrasts emphasize the color of the feathers.
If the feeding station is on the ground, there is probably a little more activity. Ground feeding mammals will often visit feeding stations for an easy meal. These visitors will also raise the likelihood of raptors in the area.
A ground station is a bit easier for a temporary camera. A miniature tripod is all you should need to snap some great video.
If you do have raptors hunting around your feeding station and budget allows, buy a 2nd camera. A good quality camera for close-up shots and another placed higher up and further away. A wider angle will show more of the social interaction between the birds. In contrast, the close-up camera captures all of those priceless expressions.
Conclusion
If you have purchased or already own a Go-Pro, one thing you can do is purchase a spare case. The spare you can leave permanently set up by the feeding station. Just place and remove the camera as needed. We hope you enjoyed this article on how to set up a bird feeder camera.
Fly high friends!
FAQ
Specialist cameras are specifically designed to shoot birds on feeders. That puts them a step ahead of the other, more generic cameras. Our advice is to figure out where you want to put the camera and feeder, what birds you think will visit the feeder and then go to a camera store and ask to look at the models they have.
Well, there is nothing like getting the shot yourself. You could invest in a portable hide and set that up in your garden and photograph the birds in the traditional manner. We know that birds are hungry in the mornings so they should be fairly predictable, especially if you put food out at the same time for them.
No, you don’t. 90% of bird photography is being in the right place at the right time. As your feeder is in your garden, then you have the right place and the right time is after you out food out. You can use any model of digital camera to shoot, preferably with some zoom function. Cameras have an option that allow it to choose all the best settings, so all you have to do is wait and shoot.